Technique: Papercrafting
Materials:
600 gsm card stock
background paper
adhesive
Distress Inks
* Faded Denim
* Stormy Sky
Number 10 crochet thread
craft metal sheet
snowflake sequins
Perfect Pearls
silver ink
Tools:
Sizzix Big Shot
Tim Holtz Alterations
* Carved Ornaments
* Mini Flourish
1.5mm crochet hook
The challenge at Simon Says Stamp and Show this week is to Show Some Metal. As expected many of the DT examples and entries have a vintage meets industrial come grungy feel as is true to the Tim Holtz style. I wanted to do something a little different, and use plenty of Tim Holtz tools and techniques, but come up with something unexpected.
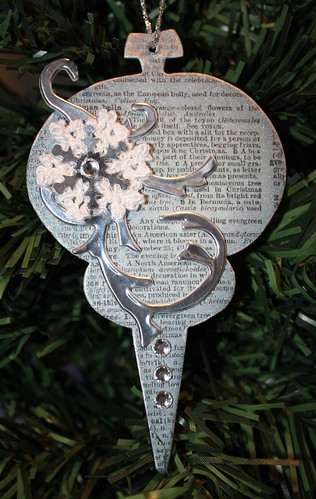
Cover both sides of plain card stock with a background paper, I chose a dictionary paper with Christmas definitions, but I plan to do others with music paper in a red and gold theme, lots of scope for creativity. When it's properly dry run it through the Sizzix with the carved ornament die. Ink up the edges with distress inks, I wanted a blue and silver theme so I have used stormy sky and faded denim.
I have made my own home made version of Perfect Pearls using white pearl cosmetic mica (think mineral make up), added to a mixture of water with just a few drops of gloss medium to act as a fixative. Once upon a time I taught soap making and I have copious amounts of cosmetic glitter and mica in a vast array of colours sitting on the shelf doing nothing. I imagine for most its simply easier to use Perfect Pearls or Glimmer Mist or similar product. The front and back of the ornament are spritz with a white pearl glimmer. Finally, ink the edges with silver ink, I used Versacolour for the metallic inks, I love their thick, sticky texture.
Adhere a piece of silver craft metal to an offcut of card stock and run it through the Sizzix using the mini flourish die to create the silver flourish.
Make one snowflake following the directions below. The original pattern can be found here.
Ch 4, sl st into 1st ch OR make magic ring.
Round 1: Ch 5 (counts as 1 dc and ch 2), sc in ring, *ch 2, dc in ring, ch 2, sc in ring; repeat from * 5 times; ch 2, sl st in 3rd ch of starting ch 5 for a total of 6 petals. Do not pull magic circle too tight.
Round 1: Ch 5 (counts as 1 dc and ch 2), sc in ring, *ch 2, dc in ring, ch 2, sc in ring; repeat from * 5 times; ch 2, sl st in 3rd ch of starting ch 5 for a total of 6 petals. Do not pull magic circle too tight.
Round 2: In same ch as sl st, work: sc, ch 3, sc in 2nd ch from hook, ch 1, dc, ch 2, sl st in top of dc just worked, ch 3, sc in 2nd ch from hook, ch 1, sc, ch 3, sc in 2nd ch from hook, ch 1; in next dc and in each of next 5 dc around work: *sc, ch 3, sc in 2nd ch from hook, ch 1, dc, ch 2, sl st in top of dc just made, ch 3, sc in 2nd ch from hook, ch 1, sc, ch 3, sc in 2nd ch from hook, ch 1; sl st in starting sc of this row; bind off. Weave in ends.
Finishing is simply a matter of adhering the layers onto the base ornament and adding a bit of bling.

Stunning ! What a gorgeous project and so beautifully crafted . I love it !!
ReplyDeleteMarie
Fabulous ornament, beautifully decorated. Tracy x
ReplyDelete