Technique: Crochet
Materials:
medium weight yarn of choice
Tools:
4mm hook
I was taught to do the basic granny square when I was quite young. Of course after not doing any crochet for years I totally forgot how to do one again, but it is one of the most basic crochet patterns and easily picked up again.
The great thing about the granny square is that you can finish one off pretty quickly, and they are very portable making it ideal as a travel project.
If you have never tried a granny square here is a lovely tutorial. The original pattern for the bag can be found here: Flower Tote Bag.
Note: The original pattern was offered freely to all at the above link. Since my first publishing of this post it has been removed and it is now offered for sale here. If you want the original pattern as it was published, please follow the link provided.
As for the instructions below: I believe that the regular old granny square pattern is considered common property, freely available for all. I have adjusted my pattern below to use only the granny with a link to a free tutorial on how to embellish with a flower. I have also made a number of changes to the pattern along the way, both in size, materials used, and construction. Whilst I would never claim that what is below is an original pattern created by me, I feel I have made enough changes that it is not breaching the original owner's copyright.
The original pattern calls for #5 crochet cotton in Ecru, which I bought but the band on the ball of cotton recommended a 2mm hook, whereas the pattern calls for a 4mm hook, so as you can image the resulting squares were much looser than I would have liked.
Ever since the Sound of Music I have had a love for string, and I happened to have some soft cotton string in the pantry, so I decided to use that. It is a similarly neutral colour, and the strength is excellent.
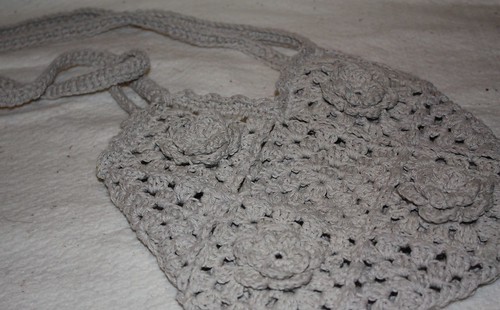
In total you will be constructing 13 granny squares.
2 x Granny Square A (regular granny square)
3 x Granny Square B (the joining granny squares)
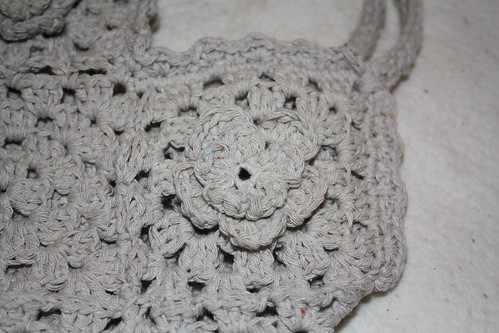
8 x Granny Flower Square (granny square with optional flower embellishment)
Join with slip stitch unless otherwise noted. Chain 2 at the beginning of each row or round counts as first DC.
Using 4mm hook
Granny Square A.
Make 2. This is the central square as shown in the photo above.
Make 2. This is the central square as shown in the photo above.
Rnd 1: Ch4, slp st into first chain to form a ring, ch 2 (counts as first dc), 2 dc in ring, [ch 2, 3 dc in ring] 3 times, ch 2, join
Rnd 2: Slp st in each of next 2 dc, slp st in next chain space, ch 2, (2 dc, ch 2, 3 dc) in same ch space, ch 1, [(3dc, ch 2, 3 dc) in next ch sp, ch 1] around, join in second ch of beginning ch 2.
Rnd 3: Slp st in each of next 2 dc, slp st in next chain space, ch 2, (2 dc, ch 2, 3 dc) in same ch space, *ch 1, 3 dc in next ch 1 sp, ch 1 **, (3dc, ch 2, 3 dc) in next ch 2 sp, rep from * around ending last repeat at **, join in second ch of beginning ch 2.
Rnd 4: Slp st in each of next 2 dc, slp st in next chain space, ch 2, (2 dc, ch 2, 3 dc) in same ch space, ch 1, *[3 dc in next ch 1 sp, ch 1} twice**, (3dc, ch 2, 3 dc) in next ch 2 sp, ch 1, rep from * around ending last repeat at **, join in second ch of beginning ch 2, fasten off.

Granny Flower Square.
Make 8. These are the four squares that get attached to the central square that you just made (see photo above).
Note: If you want the exact granny flower squares that I used you will need to purchase the pattern from this link. The instructions below will make the same basic granny square as shown above, and then if you would like to embellish it with a crochet flower this excellent free tutorial will show you how.
Rnd 1: Ch4, slp st into first
chain to form a ring, ch 2 (counts as first dc), 2 dc in ring, [ch 2, 3
dc in ring] 3 times, ch 2, join
Rnd
2: Slp st in each of next 2 dc, slp st in next chain space, ch 2, (2
dc, ch 2, 3 dc) in same ch space, ch 1, [(3dc, ch 2, 3 dc) in next ch
sp, ch 1] around, join in second ch of beginning ch 2.
Rnd
3: Slp st in each of next 2 dc, slp st in next chain space, ch 2, (2
dc, ch 2, 3 dc) in same ch space, *ch 1, 3 dc in next ch 1 sp, ch 1 **,
(3dc, ch 2, 3 dc) in next ch 2 sp, rep from * around ending last
repeat at **, join in second ch of beginning ch 2.
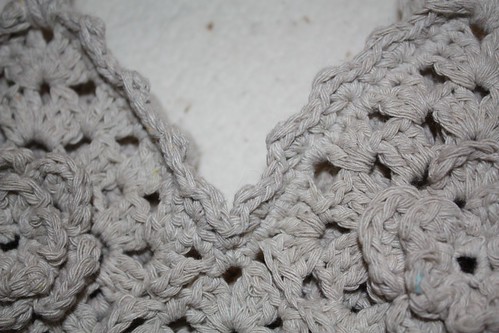
Rnd 4: (Joining round, basically between every 3dc shell you slip stitch to an adjoining square chain space to join them together): Sl st in each of next 2 dc and next ch-2 sp, ch 2, 2 dc in same ch sp, ch 1, #sl st in corresponding ch sp on other square, ch 1, 3 dc in same sp on this square, [ch 1, sl st in next ch sp on other square, 3 dc in next ch sp on this square] twice, ch 1, sl st in next ch sp on other square ##, 3 dc in next ch sp on this square, ch 1, sl st in next ch sp on other square, ch 1, 3 dc in same ch sp on this square rep from # number of times needed to join squares for front and back, ending at ##, making sure to join all corners tog where there is more than 2, working on this square, *[ch 1, 3 dc in next ch sp] twice**, (3 dc, ch 2, 3 dc) in next ch sp, rep from * around, ending last rep at **, join in 2nd ch of beg ch-2. Fasten off.
Granny Square B (the joiner squares)
Make 3
Rnds 1-3: Rep rnds 1-3 of Square A (essentially the first 3 rounds of a basic granny square)
Rnd 4: Rep rnd 4 of flower square, joining according to front and back illustrations.
Top Edging
Rnd
1: With 4mm hook, join with sc in ch 2 sp on any square along the
top, sc in each ch sp and in each st around, join in beg sc.
Rnd
2: Ch 1, sk first st, (sc, dc, sc) in next st, sk next st, sc in next
st, [sk next st, (sc, dc, sc) in next st, sk next st, sc in next st]
across to centre back, sc in centre sc of next sc group, ch 10 (button
loop), sl st in same st as last sc, [sk next st, (sc, dc, sc) in next
st, sk next st, sc in next st] around, join in beg sc, Fasten off.
Straps
Row
1: With WS tog and 2 strands held tog, join with sc in ch-2 at
inside top point of #2 Flower Square, chain 27 or desired length, sc in
point of #5 Flower Square on front, ch 1, sc in each ch across, sl st
in beg sc. Fasten off.
Row
2: Join 2 strands with sc in ch-2 sp at inside top point of #10
Flower Square, working on opposite side of same ch as on row 1, sc in
each ch across, sc in ch-2 space at point of #7 Flower Square. Fasten
off.
Note: I did the straps a little differently to the instructions...
Row
1: With WS tog and 2 strands held tog, join with sc in ch-2 at
inside top point of #2 Flower Square, chain 100, 2sc in point of #5
Flower Square on front, sc in each ch across, sl st in beg sc. Fasten
off.
Hello,
ReplyDeletealthough your post is a bit older, I'd like to send you a huge thank you!
This is such a wonderful bag and I just re-started knitting and crotcheting. I hope that I'll be able to make such a bag in future. Thanks for all your work put into this tutorial!Greetings from Germany, Gabriele
Thank you, such a wonderful purse
ReplyDeleteI did make this bag, and when I took it into my yarn shop, I got oohs and ahs from everyone!
ReplyDeleteI made it from Berrocco Vintage Chunky in the off white. I used a piece of off white small wale cordury to line it, and made I cord for the stings. I bought a big off white flower button and it looks great!
I made this one for my 15 year old great niece who lives in the Seattle area, and I got two requests from ladies I work with to make them one....one in brown with different colored flowers, and the other an off white one with springtime colored flowers.
I am going to post pictures of the one I have done as well as the pattern on Ravelry this weekend. Look it up under ebonyeyes56.
it's wonderful creature.. thank you so much to share the pattern. I'll make it one for my nice birthday... thankyou
ReplyDeleteI have an elderly lady who wants to make a flower granny, I think she would love this if it is easy. Please tell me how to purchase the written pattern.
ReplyDeletelindarohlfing@sbcglobal.net