Technique: Decoupage, Painting, Modelling, Mixed Media
Materials:
glass bauble
Australiana wrapping paper
acrylic paints
green polymer clay
gumnuts
Tools:
curved cuticle scissors
Liquitex Gloss Medium & Varnish
paintbrush
kitchen sponge
hot glue gun
Mix about two tablespoons of white acrylic paint and a pea sized blob of blue acrylic paint and swirl lightly together to get a marbled effect, it should be the consistency of pouring cream. Pour into the glass ornament, swirl around to ensure the entire inside is covered, then drain the remainder out. Allow to dry overnight.
These cutting instructions are for right handers, lefties need to reverse it around. Hold the image in your left hand and the scissors in your right, make sure that the curve of the scissors are pointing toward your right also, you want the curves of the blades to be cutting away from your picture, not into it.

First you want to cut away all of the background, so that all you are left with is the koala.

He is not a very big fellow, but even a small image can present a challenge when being glued to a curved surface. If you tried to glue him as a whole image, you would find that the bulkiest areas of the image would crease and buckle. What we need to do is identify which areas we suspect that will occur in, and clip into them. The theory is much like clipping the seam in a garment so it lies flat.
The best areas to cut are along the natural lines in your image, these will become invisble when glued down and give the appearance of a flat, seamless image. For our koala we would cut along the dotted lines indicated.

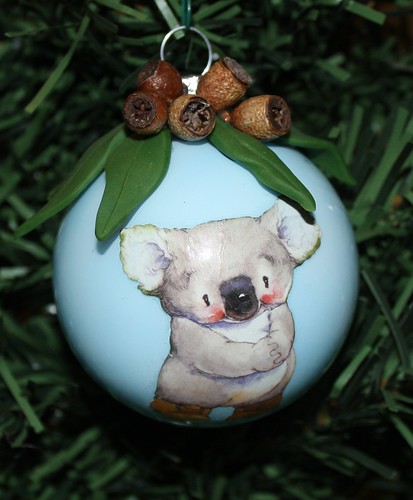
Condition and soften a small amount of green polymer clay. Run it through a pasta machine on the widest setting, or roll out with a brayer. Cut long, thin leaves to resemble gum leaves. Make a mark down the centre for the vein and curl the leaves a little to make them appear more natural. Place onto a sheet of baking paper and cure in oven according to manufacturers directions. When cool, apply the leaves and gumnuts to the top of the bauble with hot glue.
Happy Australia Day!!
These cutting instructions are for right handers, lefties need to reverse it around. Hold the image in your left hand and the scissors in your right, make sure that the curve of the scissors are pointing toward your right also, you want the curves of the blades to be cutting away from your picture, not into it.

First you want to cut away all of the background, so that all you are left with is the koala.

He is not a very big fellow, but even a small image can present a challenge when being glued to a curved surface. If you tried to glue him as a whole image, you would find that the bulkiest areas of the image would crease and buckle. What we need to do is identify which areas we suspect that will occur in, and clip into them. The theory is much like clipping the seam in a garment so it lies flat.
The best areas to cut are along the natural lines in your image, these will become invisble when glued down and give the appearance of a flat, seamless image. For our koala we would cut along the dotted lines indicated.

Now you have quite a floppy and flimsy piece of paper. When we glue him down, because of our cuts, little pieces of him will tuck in and overlap, this is exactly what we want to happen. We do, however, need to make sure that we glue him down so that the right bits are tucked away. For example, if we glued his head down first, then when it came time to do his chest that would overlap up over his nose, looking out of place. So identify which portion of the koala is the most background and start there, which is the chest area just under his nose.
Start with a small brush dab a little liquitex directly onto the glass ornament and then using your fingers to keep the area you don't want glued yet lifted, brush the first area into place. Now add a little more liquitex and smooth his face into position. Keep his arms lifted up, smooth his right leg down, then his tummy, then the arms and shoes. He should now be loosely held to the glass with Liquitex. Give him a good checking, ensuring that there are no gaps between the slits you have made in the paper and everything is in the correct order. Once you are satisfied apply firm pressure with a barely damp sponge over the top of the image, working a small section at a time. This is important to ensure that the image flattens and that all air bubbles are removed. Once he is smooth and fully secured set aside and allow to dry overnight.
The next day, using a clean, damp sponge, gently wipe over the top of him and clean the surrounding glass. You can now place another coat of Liquitex directly over the top of him as a final coat of sealant.
To finish:
Condition and soften a small amount of green polymer clay. Run it through a pasta machine on the widest setting, or roll out with a brayer. Cut long, thin leaves to resemble gum leaves. Make a mark down the centre for the vein and curl the leaves a little to make them appear more natural. Place onto a sheet of baking paper and cure in oven according to manufacturers directions. When cool, apply the leaves and gumnuts to the top of the bauble with hot glue.
Happy Australia Day!!
No comments:
Post a Comment