Monday, January 31, 2011

Back To School Chalkboard

Back To School


Technique: Painting, Decoupage, Mixed Media

Materials:
wooden coaster
acrylic paints
all purpose glue and sealant such as Modge Podge
alphabet chipboard cutouts
scraps of red and green fabric
flexible wire


Tools:
paintbrush
scissors
sandpaper
wire snips
needle nose pliers
hot glue gun

Today was the first day back at school after more than six weeks of holidays! As much as you love your kids, by the end of the holidays they are bored and restless, and I am usually frazzled! I only have one child of school age, and he started upper primary today. The little man was quite excited, and proclaimed he felt rather "upper".

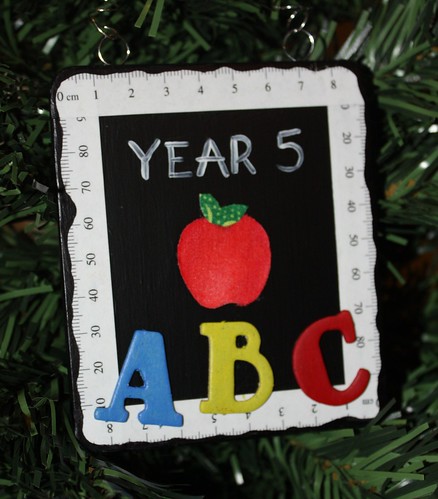
Give the coaster two coats of black acrylic paint, sanding lightly between coats, and then a coat of sealer.

This site has a wide variety of paper rulers available to print out. In Australia we are metric, but there are imperial rulers available also. Print out the ruler of your choice and cut strips that will become the border of your "chalkboard" (a little trivia here in Australia we call it a black board, because, well, it's black!!). Once your ruler strips are trimmed, glue into position and allow to dry.

Paint your chipboard letters in bright primary colours and allow to dry. Glue into position along the bottom of the board. Cut a small circle from the red fabric for the apple, and a few leaf shapes from the green fabric. Glue these into position in the middle of the board. With white acrylic and a fine brush, write the year or grade level of your child. Allow the entire project to dry thoroughly and give a finishing coat of sealer.

Wrap the wire around a pencil about a dozen times and then slip off. Bend and stretch as necessary to form a hanger. Make two loops of wire and hot glue to the back of the coaster, then attach the hanger through the loops.

On the reverse of the coaster, which I haven't photographed for privacy reasons, I have glued the school logo, and also made a note of what his teacher's name is and what class room number he is in for this year.

Sunday, January 30, 2011

Felt Donut

Felt Donut


Technique: Sewing

Materials:
pink and brown felt
bugle beads
stuffing
ribbon

Tools:
needle and thread

Using a circle template draw a 3 1/2" circle onto a piece of paper. Trace a 1" circle size in the middle of the 3 1/2" circle so that you have a donut shape. If you do not have a circle template, a regular drinking glass and a shot glass will give the same result. Cut out the donut so that you have your paper template.

Cut two donuts from brown felt and one from pink felt. Working with just the pink layer, attach bugle beads to resemble sprinkles.

Layer all three pieces together and whip stitch the centre circle with pink thread. Working with only the two brown layers and brown thread, whipstitch the outside of the donut, leaving a 1" gap. Insert stuffing, pushing all the way around the donut with a chopstick until it is evenly distributed and firm to the touch. Whipstitch closed the last inch.

Switch back to the pink thread and whipstich down the outside edge of the pink felt. Stitch a piece of pink ribbon in place if you wish to hang the donut.

Saturday, January 29, 2011

Distressed Gingerbread Cookie

Distressed Ginger Ornament


Technique: Sewing, Painting

Materials:
calico fabric
acrylic paints
buttons
"jingle" bell
embroidery floss
scrap plaid fabric
wire
sandpaper
quilt batting
sea sponge
sandpaper

Tools:
sewing machine
sewing needle
hot glue gun
stippling or stencilling brush
thin paint brush
pinkingshears

Cut two 5" squares from the calico and one or two 5" squares from the batting (depending on thickness of batting and how thick you would like your cookie). Make a sandwich from the calico and batting so that you have one layer of calico, one or two layers of batting and then a layer of calico. Using a large glass or a circle template draw a circle onto the calico. Take 'sandwich' to sewing machine and sew along the drawn line. Cut circle out with pinkingshears.

Now that you have your base cookie, it's time to get creative. Using two or three different tones of brown and the sea sponge dapple over the cookie, being sure to get into the groove caused by the sewing and the edges. Allow to dry overnight. Using the sandpaper distress the top of the cookie, be light in some areas, firmer in others. Scrunch the cookie up to force creases and sand right over the top of the scrunched fabric. When you have finished sanding, wipe over the cookie with a damp sponge.

Using the stencilling brush and a little red paint, dry brush in high lights for the cheeks. Using the thin brush and white acrylic thinned down a little, draw the wavy line around the outside of the cookie. When dry sew on the buttons for eyes and the jingle bell for a nose. Use either black paint or black embroidery floss for the eye brows to give the cookie a worried look (she's a distressed cookie, get it?!)

Make a loop from the wire and push the ends into the top of the cookie between the layers of batting and calico, then bend the tips so that it doesn't just slip right out again. Cut a strip from the plaid fabric and form a bow, then adhere using hot glue.

Friday, January 28, 2011

Catching up with Grace is Overrated

Once a week I spend the day playing catch up, adding the finishing touches to any projects not quite yet done, taking photos and browsing the net for inspiration, and as always, looking for free patterns and interesting tutorials. To stick to my commitment to posting daily, I'll share with you something that I thought was a fabulous find.

I find it kind of funny that scrap booking is such a huge crafting industry, when in many ways it really is just a combination of journal writing and decoupage.  So today I explored creativity of a different kind, journaling.  I found these fabulous, fabulous pages by Christie at Grace is Overrated.
.


The pages come either in black and white ready for you to colour, or pre-coloured, and of course full of journaling prompts and topics.   With 39 different pages, and growing, this is a fabulous resource for young and old.

Thursday, January 27, 2011

Six Inch Crochet Blanket Sampler - Granny Twist

Granny Twist


Technique:  Crochet

Materials:
8 ply yarn in 3 colours

Tools:
4mm crochet hook

Finished Size:
6 inches

The original pattern comes from the book 200 Square Crochet Blocks by Jan Eaton.

Wednesday, January 26, 2011

Give Me A Home Among The Gum Trees

Koala Ornament


Technique: Decoupage, Painting, Modelling, Mixed Media

Materials:
glass bauble
Australiana wrapping paper
acrylic paints
green polymer clay
gumnuts


Tools:
curved cuticle scissors
Liquitex Gloss Medium & Varnish
paintbrush
kitchen sponge
hot glue gun

Mix about two tablespoons of white acrylic paint and a pea sized blob of blue acrylic paint and swirl lightly together to get a marbled effect, it should be the consistency of pouring cream. Pour into the glass ornament, swirl around to ensure the entire inside is covered, then drain the remainder out. Allow to dry overnight.


These cutting instructions are for right handers, lefties need to reverse it around.  Hold the image in your left hand and the scissors in your right, make sure that the curve of the scissors are pointing toward your right also, you want the curves of the blades to be cutting away from your picture, not into it.


First you want to cut away all of the background, so that all you are left with is the koala.


He is not a very big fellow, but even a small image can present a challenge when being glued to a curved surface.  If you tried to glue him as a whole image, you would find that the bulkiest areas of the image would crease and buckle.  What we need to do is identify which areas we suspect that will occur in, and clip into them.  The theory is much like clipping the seam in a garment so it lies flat.

The best areas to cut are along the natural lines in your image, these will become invisble when glued down and give the appearance of a flat, seamless image.  For our koala we would cut along the dotted lines indicated.


Now you have quite a floppy and flimsy piece of paper.  When we glue him down, because of our cuts, little pieces of him will tuck in and overlap, this is exactly what we want to happen.  We do, however, need to make sure that we glue him down so that the right bits are tucked away.  For example, if we glued his head down first, then when it came time to do his chest that would overlap up over his nose, looking out of place.  So identify which portion of the koala is the most background and start there, which is the chest area just under his nose.

Start with a small brush dab a little liquitex directly onto the glass ornament and then using your fingers to keep the area you don't want glued yet lifted, brush the first area into place.  Now add a little more liquitex and smooth his face into position.  Keep his arms lifted up, smooth his right leg down, then his tummy, then the arms and shoes.  He should now be loosely held to the glass with Liquitex.  Give him a good checking, ensuring that there are no gaps between the slits you have made in the paper and everything is in the correct order.  Once you are satisfied apply firm pressure with a barely damp sponge over the top of the image, working a small section at a time.  This is important to ensure that the image flattens and that all air bubbles are removed.  Once he is smooth and fully secured set aside and allow to dry overnight.

The next day, using a clean, damp sponge, gently wipe over the top of him and clean the surrounding glass.  You can now place another coat of Liquitex directly over the top of him as a final coat of sealant. 

To finish:

Condition and soften a small amount of green polymer clay. Run it through a pasta machine on the widest setting, or roll out with a brayer. Cut long, thin leaves to resemble gum leaves. Make a mark down the centre for the vein and curl the leaves a little to make them appear more natural. Place onto a sheet of baking paper and cure in oven according to manufacturers directions. When cool, apply the leaves and gumnuts to the top of the bauble with hot glue.

Happy Australia Day!!

Tuesday, January 25, 2011

Aussie Road Signs

Platypus Road Sign


Technique: Papercraft

Materials:
600gsm cardstock
glue
sealant


The Australian native wildlife are some of the most unusual animals in the world, and our road signs warning that they are nearby are very distinctive, making for wonderfully unique ornaments! Simply print and cut out the images below and glue them onto cardstock and hang.


Sunday, January 23, 2011

Jack Skellington

Jack Skellington Ornament


Technique: Freehand Drawing

Materials
white acrylic paint
glass bauble
Bic Mark It pens

Add a little water to the white paint until it is the consistency of pouring cream. Pour into the bauble and swirl around to coat the inside fully and then tip upside down and drain. I have a little lab beaker that I use for this, works a treat!

Using the above photo as a guide, draw Jack's details onto the bauble with a black permanent marker. If you make a mistake simply dip an orange stick or toothpick into some isopropyl alcohol and rub away the boo boo. This is the first in a series of six Nightmare Before Christmas ornaments.


Set 6 Jack Skellington Ornaments


Jack Skellington Ornament

Jack Skellington Ornament

jack3Jack Skellington Ornament

Jack Skellington Ornament

Jack Skellington Ornament

Jack Skellington Ornament

Saturday, January 22, 2011

Salt Ceramic Glittering Icicle

Salt Ceramic Glittering Icicle


Technique: Modelling

Materials:
1 cup salt
1/3 cup water
1/2 cup cornflour
1/4 cup water, extra
spray adhesive
glitter

Tools:
saucepan
stirring spoon

Combine the salt and 1/2 cup in a saucepan and stir constantly over a low heat for around 5 minutes. You don't want it to boil (and burn), but you do want the water at as close to boiling temperature as you can get it. What you are trying to do is make a saturated salt solution, that is dissolve as much as the salt as possible in the water.

In a separate container combine the cornflour and 1/4 extra water until you have a smooth paste. Remove the pot from the heat and working quickly, pour the cornflour paste into the sauce and mix thoroughly. It should come together into a dough. Cover with a damp towel and allow to cool for around 15 minutes then knead until smooth.

Salt Ceramic, also called Victorian Salt Clay, makes an excellent modelling "snow". It feels very similar to regular playdough but it still has full salt crystals which give it an element of sparkle. To make an icicle simply take a ball and roll it between your palms until you have a cone shape. Flatten off the top a little and push in a stainless steel safety pin.  It must be stainless steel or it will rust! Set aside to dry on parchment paper for a week, and then seal, spray with glue and then glitter.

A word of caution on storing salt doughs. Salt is a humectant, that is it will draw moisture from the atmosphere. It must be sealed thoroughly otherwise over time it will draw moisture into the dough and it will soften.

Friday, January 21, 2011

Aquarius Quilted Ornament

Aquarius


Technique: Kimekomi (Or New Sew Fabric)

Materials:
styrofoam ball
fabric
cord, braid etc
paper
piece of string

Tools:
orange stick (cuticle stick)
scissors
ruler
scalpel
compass

Long before it had the name Kimekomi, I had seen fabric Christmas ornaments at fetes and fairs. Now that it has the name Kimekomi there are of course specialized tools you can buy, but it's not necessary at all.

Firstly, wrap a piece of string around the middle of your styrofoam ball to measure the circumference. Whatever length it is, divide that by six, and mark that on your string. Your ball should have a mould line, a straight line around the circumference. Using the string, mark the 6 segments around the mould line.

There are lots of tutorial videos to show you how to segment Kimekomi balls, this is just how I do it. Using your string, make marks around the ball, then with a pencil, join opposite marks, like a dot to dot around a ball. This should create six evenly spaced segments around the ball, like an orange.

Set your compass to the same width as the segments, and starting at lines that intersect begin drawing circles around your ball. Rather than give you a specific pattern direction, I encourage you to draw circles on the ball until you find a pattern you are happy with.  The larger the pattern segments the easier the ball will be to construct, so bear that in mind. I will often have many circles overlapping before I find a pattern that repeats that I like.  When I did find the pattern I wanted, I outlined the score lines in red, so that it was clear which lines I needed to score.

Score each of these lines lightly with a scalpel, you want to cut down about 1/4" of an inch.

Start with one colour of fabric and cut a piece that is going to be just a bit larger than the segment you wish to cover (you can trim this as you tuck so its better to be generous than skimpy here). Hold firmly in the centre of the fabric and using the cuticle stick, tuck one edge into the groove, and then the other, working each side evenly so that the fabric remains true and doesn't distort and end up uneven. Tuck the points in and trim any excess fabric if necessary. Continue in this manner until all six wedges of fabric have been used.

Chose a cord or braid that compliments your fabric. If using a thin cord this will sit neatly into the channels, and the ends will tuck into the ball nicely. Braid is thicker and will sit over the channel, you can use glue or decorative pins to secure this in place. The same process applies to the hanger. You can push some cord into the top of the ornament with a skewer, or use a decorative pin to secure a loop of braid to the top.

Thursday, January 20, 2011

Six Inch Crochet Blanket Sampler - Gothic Square

Gothic Square


Technique:  Crochet

Materials:
8 ply yarn in 3 colours

Tools:
4mm crochet hook

Finished Size:
6 inches

The original pattern comes from the book 200 Square Crochet Blocks by Jan Eaton.

Wednesday, January 19, 2011

Three Blind Mice Part 3

Three Blind Mice (white)


Technique: Knitting

Materials:
8 ply or double knit wool in three colours
bells, buttons or embellishments if desired

Tools:
scissors
3.5 - 4mm knitting needles

Tuesday, January 18, 2011

Three Blind Mice Part 2

Three Blind Mice (Blue)

Technique: Knitting

Materials:
8 ply or double knit wool in three colours
bells, buttons or embellishments if desired

Tools:
scissors
3.5 - 4mm knitting needles

Did I mention yesterday that these little guys were so cute and quick to knit that I couldn't stop at one?

Monday, January 17, 2011

Three Blind Mice - Part 1

Three Blind Mice (red)

Technique: Knitting

Materials:
8 ply wool in three colours
bells, buttons or embellishments if desired

Tools:
scissors
3.5 - 4mm knitting needles

Three Blind Mice (group)

Before delving into the pattern the two small things that I did change. Originally I did put eyes on my first mouse, but when I put the bonnet on it came forward so far it completely covered them, which led to the idea of the Three Blind Mice. After that I deliberately left the next two without eyes.

Also, the pattern calls for 4mm needles and the closest I had was 3.75mm and they still came out perfectly. These little mice knit together very easily, even for someone with little to no knitting experience (me!!).

Aside from the basic knit and purl stitches you will be using two types of stitches that decrease the row. K2TOG is just as it says, you knit two stitches together as if they were one. SKPO also decreases, but it does so in such a way that the stitches lie in a different direction to K2TOG. First you slip a stitch from the right needle to the left without working it at all, knit the next stitch, then loop the slipped stitch over the stitch you just knitted. Utilizing both of these stitches is what gives the mouses nose that lovely point.

Holiday Mouse

Materials: 15 g worsted weight yarn in main colour (MC), 10 g of worsted weight yarn in contrasting colour (CC), small amount of pink worsted weight yarn, stuffing, pair of 8 mm safety eyes or buttons (or black yarn), 4 mm (US size 6) set of dpns or pair of needles), tapestry needle

Size: 8 cm (3")

Gauge: 22 sts and 32 rows per 10cm (4˝) in st st

Notes: Instructions are written for knitting flat with straight needles. To knit the toy in the round on dpns, knit all odd rows, rather than purling them (except for bobbles). Please note that you may need to shuffle sts between needles occasionally, in order to work the increases and decreases. Remember to attach safety eyes and stuff head before working Row 16.

MB = Make Bobble
Row 1: increase 5 sts into next st (knit into front, then back, front, back, front of st). (5 sts)
Row 2: p5, turn.
Row 3: k5, turn.
Row 4: p2tog, p1, p2tog, turn. (3 sts)
Row 5: s1, k2tog, psso. (1 st)
Then continue with pattern...

Body
Start at bottom. Cast on 7 sts with MC.
Row 1: P 1 row.
Row 2: k1, [m1, k1] x 6. (13 sts)
Row 3: P 1 row.
Row 4: k3, [m1, k1] x 7, m1, k3. (21 sts)
Row 5: P 1 row.
Row 6: k7, MB, k5, MB, k7.
Row 7-9: work 3 rows in st st.
Row 10: k6, k2tog, k5, skpo, k6. (19 sts)
Row 11-13: work 3 rows in st st.
Row 14: k6, MB, skpo, k1, k2tog, MB, k6. (17 sts)
Row 15-17: work 3 rows in st st.
Row 18: k2, [skpo] x 3, k1, [k2tog] x 3, k2. (11 sts)
Bind off. Cut yarn. Sew up back seam, leaving bound-off edge open. Stuff body.

Head
Start at back. Cast on 6 sts with MC.
Row 1: P 1 row.
Row 2: k1, [m1, k1] x 5. (11 sts)
Row 3: P 1 row.
Row 4: k2, [m1, k1] x 3, k1, [k1, m1] x 3, k2. (17 sts)
Row 5-9: work 5 rows in st st.
Row 10: k2, skpo, k1, k2tog, k3, skpo, k1, k2tog, k2. (13 sts)
Row 11: P 1 row.
Row 12: k3, k2tog, k3, skpo, k3. (11 sts)
Row 13: P 1 row.
Row 14: k2, k2tog, k3, skpo, k2. (9 sts)
Row 15: P 1 row.
Row 16: [k2tog] x 2, k1, [skpo] x 2. (5 sts)
Cut yarn, thread end through remaining sts, and pull tight to gather. Attach safety eyes. Sew seam, leaving an opening. Stuff head, adding extra stuffing to cheeks. Sew closed.

Hood
Start at front. Cast on 22 sts with CC yarn and straight needles.
Row 1: K 1 row.
Row 2: skpo, k18, k2tog. (20 sts)
Row 3: k2, p16, k2.
Row 4: skpo, k16, k2tog. (18 sts)
Row 5: k2, p14, k2.
Row 6: K 1 row.
Row 7: k2, p14, k2.
Row 8: k8, m1, k2, m1, k8. (20 sts)
Row 9: k2, p16, k2.
Row 10: k9, m1, k2, m1, k9. (22 sts)
Fold hood in half and graft together back from neck to point. Or, work one more wrong side row, then bind off, and sew back seam of hood. Add a couple lengths of yarn or ribbon to front corners for ties. If you like, add a pom-pom or bell to the hood point.

Beret
Cast on 18 sts with CC yarn and dpns. Join in the round.
Row 1-2: [k1, p1] x 9.
Row 3: [k2, m1] x 9. (27 sts)
Row 4-8: work 5 rows in st st.
Row 9: [k1, k2tog] x 9. (18 sts)
Row 10: K 1 row.
Row 11: [k2tog] x 9. (9 sts)
Row 12: K 1 row.
Row 13: [k1, k2tog] x 3. (6 sts)
Cut yarn, thread end through remaining sts, and pull tight to gather. Secure yarn ends.

Ears (make 2)
Ears must be knit flat.
Cast on 3 sts with pink yarn.
Row 1: P 1 row.
Row 2: [k1, m1] x 2, k1. (5 sts)
Row 3: P 1 row.
Row 4: k1, m1, k3, m1, k1. (7 sts)
Row 5: P 1 row.
Row 6: k1, [k2tog] x 3. (4 sts)
Bind off.

Finishing
If you're not using safety eyes, sew on button eyes, or embroider them with black yarn. Embroider a nose with pink yarn. Sew bound-off edge of ears to head or hat. Sew head to bound-off edge of body. Sew hat onto head (add a bit of stuffing to the hat if you like). For the tail, make a braid or a length of I-cord from pink yarn. If you're hanging the mouse on a tree, add a loop of yarn to the top of the head. If the mouse will be a toy, you may want to sew down the sides of the bobble feet.

Abbreviations
K or k = knit
k2tog = decrease 1 by knitting 2 together
m1 = increase 1 by picking up loop between stitch just worked and next stitch, and knit into the back of this loop
P or p = purl
p2tog = decrease 1 by purling 2 together
skpo = slip 1, knit 1, pass slipped stitch over
st or sts = stitch or stitches
st st = stocking stitch

This adorable pattern comes from www.fuzzymitten.com

Sunday, January 16, 2011

Snowy Church Cross Stitch

Snowy Church Cross Stitch Ornament


Technique: Cross Stitch

Materials:
5" square of 14 count aida cloth
cross stitch threads
frame or loop for hanging

Tools:
needle
scissors

The chart references the following DMC colours

745 - Yellow, Light Pale
743 - Yellow, Medium
977 - Golden Brown, Light
422 - Hazelnut Brown, Medium
813 - Blue, Light
793 - Cornflower Blue, Medium
775 - Baby Blue
164 - Green Very Light
163 - Green
White


You don't have to go out and buy those colours especially, when it comes to small projects I always use what's in my stash first, just match the colour and tone as closely as you can.

Saturday, January 15, 2011

Crochet Bookworm Book Mark

Book Worm


Technique: Crochet

Materials:
8 ply yarn
wiggly eyes

Tools:
5mm crochet hook
hot glue gun

Leaving a 6 inch tail at the beginning, chain 75, 3 single crochet into second chain from hook, and 3 single crochet in the next 20 chains, slip stitch to foundation chain and slip stitch back along the remaining length of chain. Tie off.

To make the tassle, spread your fingers and wind the yarn around them 20 times to make a loop. Slide off your hand and using the two loose tails on the worm, tie them around one end of the loop securely. Cut a 6" length of yarn and tie firmly around the loops about half an inch down from where you just secured it, this forms the head of the tassle. Snip the ends so they hang free.

Friday, January 14, 2011

Catching up with Mimi Kirchner

Once a week I spend the day playing catch up, adding the finishing touches to any projects not quite yet done, taking photos and browsing the net for inspiration, and as always, looking for free patterns and interesting tutorials. To stick to my commitment to posting daily, I'll share with you something that I thought was a fabulous find.

Often I find really cool stuff that I would never make myself, but still makes me go oohhh!  ahhhh!  These Tiny Worlds in a teacup by Mimi Kirchner are gorgeous, but in my house they would just gather dust.


If you are inspired to make one of your own, Mimi Kirchner sells the pattern below in her Etsy store.

Thursday, January 13, 2011

Six Inch Crochet Blanket Sampler - Flower Granny

Granny Flower Square


Technique:  Crochet

Materials:
8 ply yarn

Tools:
4mm hook

Finished Size:
6 inches

Rnd 1:  Ch 2, 5 sc in 2nd ch from hook, join in beg sc (5 sc)

Rnd 2:  (Sl st, ch 1, 4 dc, ch 1, sl st) in each st around, join in beg sl st. (5 petals)

Rnd 3: Working behind petals, ch 1, [sc in sc on rnd 1 between 2nd and 3rd dc of next petal, ch 3] around, join in beg sc (5 ch 3 loops at back of flower)

Rnd 4: (Sl st, ch 1, 6 dc, ch 1, sl st) in each ch sp around, join in beg sl st (5 larger petals)

Rnd 5:  Working behind petals, ch 1, *sc in ch sp on rnd 3 in space between first 2 dc on petal, ch 4, sc in same ch sp between last 2 dc of same petal, ch 4**, sc in next ch sp on rnd 3 between 4th and 5th dc on petal, ch 4, rep from * around, ending last rep at **, join in beg sc (8 ch 4 loops at back of flower)

Rnd 6: Sl st in first ch sp, ch 2, (2 dc, ch 2, 3 dc) in same sp, ch 1, *3 dc in next ch sp, ch 1**, (3 dc, ch 2, 3 dc) in next ch sp, ch 1, rep from * around, ending last rep at **, join in 2nd ch of beg ch-2 (in this round you form the foundation for the granny square)

Continue adding rounds until the square is your desired size.

Wednesday, January 12, 2011

Cherub Tag

Cherub Tag


Techniques: Paperclay, Scrapbooking

Materials:
paperclay
luggage tag, either chipboard or strong card
scrapbooking embellishments
PVA glue
sealant
acrylic paints

Tools
Brown Bag Cookie Mold, or similar
rolling pin
paint brushes

With damp hands knead a golf ball sized amount of paperclay until smooth and pliable. This doesn't take long, paperclay is such a lovely medium for this type of project. It's easy to handle, forms into moulds very well, air dried, lightweight, easy to paint.

Place the ball of paperclay into the centre of your cookie mould and squish down firmly. Use a rolling pin to force it into all the creases and to ensure it reaches the edges. Once you have rolled it you should be able to gently peel back a corner and lift it out of the mould. Trim edges and allow to try.

Basecoat entire cherub plaque with a basecoat of white acrylic and allow to dry. Then paint in desired colours. Allow to dry overnight and give front and back a coat of sealant.

Embellish luggage tag with scrapbooking elements. Use the PVA glue to stick the cherub plaque to the tag. Allow to dry overnight and add a hanging cord.

Tuesday, January 11, 2011

Crochet Snowflake

Crochet Snowflake


Technique: Crochet

Materials:
10 weight crochet cotton

Tools:
Size 3 (1.25mm) Steel Crochet Hook
Tapestry Needle

Chain 7, join

Round 1: *Chain 3, Single Crochet in the loop, Repeat 8 times total from *.

Round 2: Ch 3, Work 2 DC in the same loop, CH 2, *Work 3 DC, CH 2, complete 7 times total from *, join with the beginning chain.

Round 3: *Chain 4, Work a cluster through the top of the 3 previous DC. CH 4, SC in the CH 2 space. Complete 8 times total from *. Work a Triple Crochet at the base of the beginning chain, instead of the last chain 4. You will want to end at the top by the cluster. Slip stitch back in to the top of the cluster.

Round 4: ** Chain 6, join, slip stitch in to the chain 6 * CH 4 SC in the loop, complete 5 times total from * (5 chain 4 loops), CH 3, SC in the next loop, CH 3 SC in the next loop, CH 3, SL ST in the center of the next cluster, Complete 8 times total from**

Using the tapestry needle, weave in the loose ends.

Soak in a mixture of 50% pva glue and 50% water until completely saturated. Squeeze out by hand and blot with a paper towel. Using stainless steel pins, pin out onto a board. This is called blocking and ensures that the pattern is set evenly. Sprinkle with glitter and allow to dry. If you have a disaster like I did and realize after the fact that your pins were not stainless steel and they left horrid rust marks on your snowflake, all is not lost! Make a smooth paste of cream of tartar and water and cover snowflake. Let sit overnight and rinse clean in the morning, all signs of rust should be gone.

This pattern sounds a lot more complicated than it actually is, this was one of my first completed crochet patterns and I ended up with a snowflake looking collection of thread! If you are a rank beginner and struggle to understand the pattern and terms, this video has an excellent step by step tutorial of each round, stitch by stitch.

Trans-continental crochet can be a little confusing as our hook sizes are labelled very differently. In Australia they are sold by metric size, and when I put this one together I realized afterwards that the conversion chart I used was off, and so it's a little 'off'. Not to worry, I think most people are quite taken by shiny objects, a sprinkle of glitter and people will go oooohhh ahhhhh and not notice any flaws.


Monday, January 10, 2011

Recycled Card Ornament

Recycled Card Ornament


Techique Used: Papercraft

Materials:
old christmas cards
pva glue
pencil

Tools
scissors
hole punch
glass or jar that is approx 1.5" in diameter
letter opener

Using the glass or jar lid trace two circles onto one of the backing sides of the christmas cards to use as a template. One one of the circles draw an equilateral triangle. Believe it or not this is the hardest part of the whole craft! An equilateral triangle has sides of the same length and it's angles are 60 degrees. I used a small protractor to measure off the angles and cut the triangle, but you could also use a ruler and fiddle around until you found the exact measurement for each side for the side of circle that you drew. Once you have the triangle drawn, cut that out.

You should now have one circle template and one triangle template. Draw 8 circles onto the printed sides of the cards, if you are using cards that have people or scenes depicted on them rather than just patterns place the template carefully to ensure you get parts of the images that you find most pleasing. Cut out the circles, trying to follow the lines as closely as possible and avoid jagged edges.

Now place the triangle over each circle and line up carefully so that the points are all touching the edge of the circle and score the lines with a letter opener or something similar. This scoring provides the line for folding, you should now be able to fold up three 'flaps' on each circle. Do this for all eight. Working in pairs glue two edges together and allow a few minutes to dry. Glue two pair together, which will form the top and bottom, and let dry briefly before gluing the top and bottom sections together.

To hang, you can either use a hole punch as I did to make a hole for a hanging wire, or knot a piece of thin cord and place the knotted end of the loop between the two halves before gluing together.

You can make this ornament bigger by using more circles and having 5 across the top and bottom parts of the ornament, and ten across the middle band, for a total of 20 circles.

Sunday, January 9, 2011

Dressed Up Dishcloth

Dressed Up Dishcloth Closeup


Technique: Crochet

Materials:
8ply yarn
tea towel

Tools:
scissors
3.5mm crochet hook
sewing machine or needle and thread

My husband has a habit of carrying tea towels around the house the same way that linus carries his blankie, so finding a towel to wipe your hands on when you need one is a challenge. Hence the need to anchor them to something!

For this dress I used this pattern. It's fairly easy to follow and the only thing I did differently was to put a row of single crochet across the top of the bodice for a neater edge.


Dressed Up Dishcloth

Saturday, January 8, 2011

Acetate Butterfly Clip

butterfly


Technique used: Basic Painting

Materials:
clear acetate
black marker
Tile and Glass Medium
good quality thick acrylic paints
wooden beads
beading wire
glitter paint

Tools:
scissors
paintbrushes
hot glue gun
needle nose pliers


Transfer the butterfly image to the acetate with the black marker, then cut out shape. Coat one side of the acetate with the glass and tile medium, this ensures that the paint will bond permanently. Choose 3-4 colours of acrylic paint that you think will blend well together and randomly place 2 pea size dots of each colour on one wing. Fold the butterfly in half so that the wings are touching each other and then rub over one side with your finger "smooshing" the paint between the sandwiched layers of acetate. This is exactly the same style of blob painting we learned in kindergarten. Once the paint has been spread to all the edges and there are no gaps, spread the wings apart and allow to dry overnight.

Paint a wooden peg and the wooden beads black. Thread a small piece of beading wire through the beads, forming a loop at one end and antenna at the other. Glue the acetate butterfly to the peg, then glue the beads on top of the butterfly.

Friday, January 7, 2011

Catching up with Alan Dart

Once a week I spend the day playing catch up, adding the finishing touches to any projects not quite yet done, taking photos and browsing the net for inspiration, and as always, looking for free patterns and interesting tutorials. To stick to my commitment to posting daily, I'll share with you something that I thought was a fabulous find.


Alan Dart

I'm not a knitter, I grapple with the needles, I struggle with the tension, and by far I prefer to crochet, but Alan Dart's patterns tempt me so!

These little fairies are so cute! You can download the free PDF file from the official website.

While you are there browse through the other fabulous patterns he has to offer. I have purchased from his site and the delivery is immediate, the patterns easy to read and very affordable.

Thursday, January 6, 2011

Six Inch Crochet Blanket Sampler - Begonia

Begonia


Technique: Crochet

Materials:
8 ply yarn in 3 colours

Tools:
4mm crochet hook

Finished Size:
6 inches

The original pattern comes from the book 200 Square Crochet Blocks by Jan Eaton.

Wednesday, January 5, 2011

Mouse Christmas Carol Paper Tole

Mouse Christmas Carol Paper Tole


Technique: Paper Tole

Materials:
christmas card or image that you like
spray Sealant
600gsm card stock
silicone
PVA glue

Tools
scissors
scalpel or hobby knife
paintbrush
styrofoam pad
paper tole tool
high resolution colour printer

Paper tole, or 3D decoupage as it is often called, is where you use one image that you have cut several times, and then layer to give a three dimensional effect.


Once you have found an image that you want to use, you must make 5 to 6 copies of the image. If it is an image you found online, or the one above, simply print it a few times on the same sheet of paper. Use high resolution paper and print at the highest quality you can. If you are using a christmas card you will need to scan it in and then reprint several copies (or purchase several cards!)

The first step is to seal the backs of the images. The silicone that we use to raise each layer will leave a dark spot on your paper unless you protect it with a sealant first. Seal the front and back with the spray sealant.

Glue one image to the card stock, this will be the base upon which you build the rest. For mine, I cut closely around the music sheet, eliminating all of the red background, but you could keep that in if you prefer.

I won't give exact directions on what to cut as you may have chosen a different image to mine. Look at your picture and try and divide it into background, middle and foreground. For the mouse carollers I cut all three mice as one piece, and then from another sheet I cut the heads and scarves of all the mice. Then from another sheet I cut their ears. What we are looking for is pieces that can be layered to give depth and perspective.

Once you have cut the pieces you want to use it's time to give them a little shaping. A paper tole tool is a simple shaping tool, with a blunt end designed for making soft curves, and a sharper edge designed for scoring and creasing. Lay the first piece you want to add onto a foam board or piece of styrofoam and gently rub over it in small circles. If you don't have a paper tole tool you could use a marble to get the same effect. Gently rub until you have put a little shape into the piece. Now turn it over and mark in any creases, pleats or folds. Take a small piece of silicone onto a toothpick, no bigger than the pip in an orange, and place several dobs on the back of your image and then place it onto your backing image and line the two up as precisely as you can. This will now become the foundation for the rest of the pieces so it is important that it is well supported.

Working now with the mid-ground images, do the same, shape them and then place them onto the ornament with small amounts of silicone. The silicone doesn't take long to adhere and set, but you should ensure that it has a firm hold before attaching a new piece, or as you are sliding it into position you could upset the layer beneath.

For the final pieces, the ones that are going to be in the most foreground, try and work a little more detail into the shaping and be a little creative with the silicone to add angles. For example with the ears on the mice, they would be touching at the point where they join the head, but they could be angled away from the head and lifted just as real ears would be.

When you are happy with the piece, allow it to set up properly for a few hours and then give another coat of sealant. Attach a hanger to the back of the ornament.